Online Teaching and Learning (Chapters)
Chapter 10: Instructional Materials
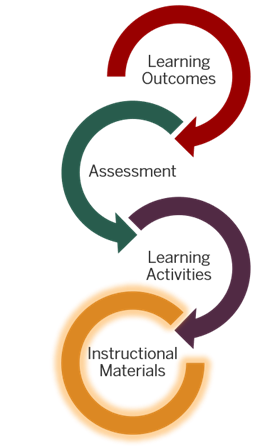
Instructional Materials
How do you choose materials to use in your online course? You may already have some of your materials identified such as textbooks, other books, articles, or online publisher materials or digital learning tools.
As you put together your instructional materials, if you’re gathering materials that were not created by you or by the publisher of a text that your students have purchased, you should always verify the use and attribution requirements for those materials.
Evaluation Criteria
As you evaluate instructional materials, the first things you normally consider are
- is it accurate?
- is it relevant? (Does it provide information that students need to complete your assignment?)
- is it understandable? (Is it at a level appropriate to your student’s current understanding of the topic or concept?)
When evaluating instructional materials, consider the extent to which each is interesting, approachable, and engaging. This isn’t about materials being “entertaining.” It’s about whether it can spark curiosity and promote deeper thinking about the content. The more engaged students are with the materials you provide for learning, the more they’ll learn. To encourage engagement it is helpful to include a variety of types of materials in addition to text such as images, charts, diagrams, audio, video, or interactive activities.
There are some specific things to look for in both text and video materials that can increase the potential for engagement.
Text-based Materials

As you look at text-based materials, there are a few things to consider.
- Are instructional materials with a teaching purpose (so not journal articles, primary sources, etc.) written in a friendly and conversational tone?
- Are materials written at an appropriate reading level for your students? Realize that this will be lower than your reading level so what sounds fine to you may leave your students struggling. If you aren’t sure, you can run part of it through a Readability Checker.
- Are documents clear and easy to read? If it’s a scanned document, is the quality of the scan good enough that it can be easily read? If it’s skewed, blurry, or grainy it’s best to go through the library and get a better version. If it’s an article, it may be available through your library’s full-text databases.
- Are documents accessible? If it’s a scanned PDF, even if it clear and easy to read, it’s important to check if it is really text or literally a photograph of the page?
You’ll also want to identify things in the material that need your explanation or commentary. If you normally talk through a resource in class, you’ll need to provide that scaffolding to your students online through annotations, narrations, or other means.
Video Materials
Part of evaluating video materials is determining how much and what sort of video would be useful for your students. Here we are talking primarily about video that others have made. We’ll look more specifically at video that you make later in this module.
If you want your students to be able to do something that someone can demonstrate, then video would be a very good option. If your content involves specific places or cultures, video can help to make them real to your students in ways that pictures and words on a page cannot. If parts of your content are especially challenging to your students, walking through these rough points with diagrams or a virtual whiteboard can provide clarification. If your students have difficulty engaging with the content, videos can offer a more approachable way in.
Good places to start to look for videos are
- Khan Academy
- Kanopy
- Crash Course series available on YouTube
While not technically video, the Smithsonian Institute’s Smithsonian X 3D Explorer offers a collection of artifacts and tours that are interactive and, as the name suggests, 3-dimensional.
Considerations for Video
- How well does the video align with your class? Is it something that will directly help students reach a learning outcome or is interesting but not directly applicable?
- Is it at the right level for your students? Do they have the prerequisite background knowledge to get out what you want them to get out of it? Students will tune out if they don’t understand what the speaker is talking about—especially if the video uses jargon, acronyms, and other technical terms the student doesn’t know.
- How long is the video? Research shows that people’s attention begins to wander after a few minutes. Do your students really need to watch all of the video or only part of it? Identify that part and crop the video or give them the beginning and ending times.
- Does the video keep your attention? If you dozed or multitasked while the video was playing, the odds are good your students will do the same.
Reusing Content
When you design an online course, you may consider the concept of reusing someone else’s content. This textbook was developed using this method.
Reusing content involves repurposing and incorporating existing materials into your course. By reusing content, you can use other’s research and academic work, instructional materials, and proven methodologies. This approach enables you to optimize your course development process and deliver high-quality online learning experiences.
Here are some tips when reusing content:
Almost everything falls under copyright law. Whether there is a copyright notice on it or not, you should presume it is copyrighted until you have evidence otherwise. So how can you tell if you can use a document, video, image or audio clip in your class legally?
If you are embedding media (for example, embedding a YouTube or TedTalk video into your course page like the Creative Commons one below) or if you are linking to an outside source (like the link below to Columbia University), copyright is not an issue. You are merely pointing students to the original source of the work, not duplicating or redistributing the work in any way. If you are not embedding from or linking to an outside source, there are three main allowances for use without requesting permission (and potentially paying a fee) to the copyright holder: public domain, Creative Commons, and fair use.
Copyright does not apply to works in the public domain; this includes general facts, words, ideas, names, short phrases (that are not trademarked slogans), methods, content written or produced by the US government, and works old enough that copyright has expired. For more information on public domain works, please see the Columbia University copyright site.
If the copyright holder has chosen Creative Commons (CC) licensing you may use the work based on the CC terms. Creative Commons and other Open Access publishing options enable copyright holders the ability to allow reuse of their works while still retaining some rights under U.S. law. For more on Creative Commons licensing, please see the following video.
If you are using a small amount of a larger work, using it in a limited way, and controlling who can access the work, you may be able to use it under Fair Use guidelines. Fair Use means using a copyrighted work
for purposes such as criticism, comment, news reporting, teaching (including multiple copies for classroom use), scholarship, or research, is not an infringement of copyright. In determining whether the use made of a work in any particular case is a fair use the factors to be considered shall include—the purpose and character of the use, including whether such use is of a commercial nature or is for nonprofit educational purposes; the nature of the copyrighted work; the amount and substantiality of the portion used in relation to the copyrighted work as a whole; and the effect of the use upon the potential market for or value of the copyrighted work.
Use the Fair Use Checklist to help you make a solid judgment—that you can justify if challenged—about whether your planned use is allowed under Fair Use.
One thing to keep in mind is that images are not a special case. Everything on the internet should be presumed to be fully protected by copyright law—including images—unless it specifically states otherwise. There are many images that are freely available to use with or without attribution through public domain or Creative Commons licenses but they’re not necessarily easy to find. Pexels and Pixabay are good sources of stock images that do not need attribution. The Wikimedia Commons has a mix of images that do and do not require attribution. Compfight is a Flickr search tool that pulls Creative Commons licensed images that you can use with attribution.
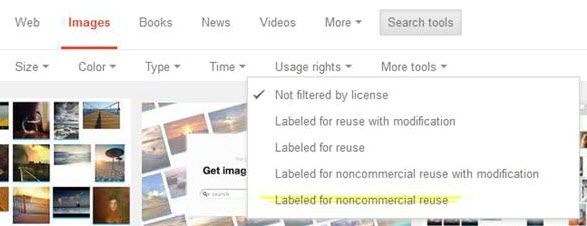
When using Google Image Search, you can filter by usage rights and select “labeled for non-commercial reuse.”
What you commonly see on a non-filtered Google image search is a large number of stock photos that other people have paid for and placed on their website. So for example, the surprised girl in this Medical News Today article is for sale from the iStockphoto repository. Just because Medical News Today paid iStockphoto for the license to use that image does not mean that anyone can take that image from Medical News Today and use it for their own purposes. Commercial stock photos are never going to fall under fair use. This is because using it without paying for it explicitly replaces the sale of the copyrighted work and there is a reasonably available licensing mechanism for use of the copyrighted work.
If you’re not sure whether or not the image you want to use is a commercial stock photo, use the TinEye reverse image search to check. You can upload the image in question or paste in the link for the image on the original site where you found it. Note that you need to use the image URL (usually ending in .jpg or .png) and not the page URL (usually ending in .com, .net, .gov, .edu, .org, .html, or .apx).
Developing Your Own Instructional Materials
In an online class, it is not just about providing students with materials from other sources. You also need to think about how you are going to provide the content and guidance that you would normally provide in the classroom. Sometimes instructors believe that they can provide only the materials used in an in-person class and that’s good enough. You are more important to your students than that. Merely providing existing materials without including anything that you would have done in class belittles your role and what you have to offer. Imagine having an in-person class where the faculty member comes in and sits down and doesn’t say or do anything. Students could ask questions, but often they don’t know what the don’t know and what they should ask. They need your guidance and instruction to put the pieces together. They need you to fill in the gaps.
 Creating content and instruction is not something that has to be overwhelming. Start small. Sharing your thoughts, analysis, examples, explanations, and perspectives provides instructor presence on a reasonable scale. When you identify a gap in your students’ understanding, instead of spending time down the black hole of YouTube looking for something someone else has made, do it yourself. You do it yourself in your in-person class all the time, so you know you can! There are several tools you can use ranging from a Word document to a short video recorded in Kaltura or Zoom, or even on your phone to an audio-only message to a “choose-your-own-path” interactive scenario.
Through it all, keep in mind that instructional materials are a means to the end of learning and not an end unto themselves. If your beautifully crafted PowerPoint presentation isn’t helping learners understand the material, try approaching it in a different way. This may mean explaining something from a different perspective, using different examples, talking through or visualizing something that was originally only in text, or writing out what you previously explained verbally.
Text
You can create written materials a variety of formats from a longer textbook-style narrative, to a Frequently Asked Questions page, a glossary of terms you know your students’ struggle with, smaller bits of explanatory text filling in gaps left by other materials, alternative examples, and more.
As with content written by others, when you write your own materials you want to think about tone and reading level. Are you writing in 2nd person, using you and your? Are you writing in a conversational tone? Are you writing at an appropriate reading level for your students? If you aren’t sure, run part of it through a readability checker.
One way to start to overcome all of these issues is to try writing like you talk. If writing like that difficult for you, an easy way to get started is using speech to text. That’s an accessibility function available on your computer but you can also just start a new email on a smartphone and dictate using Google or Siri. This will give you a good draft of your thoughts which you can edit and refine.
Audio
Though podcasts have waned in popularity over the past years, some faculty prefer to talk to their students through audio only in a podcast/audiobook style. If you have a slide presentation without any real important visual elements, an audio-only version can be a good option, especially for students who prefer to listen while they drive, exercise, or do other activities that don’t allow for full visual attention.
Audio works best when it’s conversational and shows enthusiasm for what you’re saying. While writing a script is highly recommended, you want to be familiar enough with your script to be able to read it without sounding like you’re reading. One thing people don’t often consider when writing scripts the importance of varying sentence structure and avoiding overly complex sentences that don’t leave room for you to take a breath.
If you are writing a script like a journal article, keep these tips in mind:
- Use shorter sentences: Longer, more complex sentences are harder to follow when spoken so break them apart into shorter ones.
- Use everyday words, not academic ones: Replace words like “utilize,” “leverage,” and “delineate” with words like “use” and “describe”.
- Use contractions: If you write “You do not need to read chapter 3” you’ll probably say that when recording even though in any other circumstance you’d say “You don’t need to read chapter 3.” This ties directly back to being more conversational.
- Read your script out loud as you’re writing it: The easiest way to find things that sound weird is to say them out loud while really listening to what you’re saying.
Finally, while you may find it uncomfortable to listen to your own voice on a recording, it’s important to do it at least the first few times. You may not be consciously aware of verbal habits that may be distracting to a listener. Excessive umms, aahhs, and wells, as well as pens tapping, computer fans blowing, or HVAC noise that you’ve grown used to can become a focus for listeners, distracting them from the message you’re trying to convey.
While you can record audio directly using a smartphone or computer, if you are interested in doing any audio editing, Audiomass is a free, web-based tool with many useful functions. You can use it to remove sections, trim the beginning and end, reduce noice, speed up or slow down the audio without changing the pitch, level the volume if part of your audio is louder or quieter than the rest, among other options.
Video
As we reduce the amount of time we are physically with each other and try to make the most of the time we have – whether that is in-person or on Zoom – there are some parts of a class that are easier to shift online. It’s much easier to listen to a lecture by yourself than it is to brainstorm with classmates or work collaboratively on a problem. Having lectures in video form also allows you to put comprehension questions with the lecture to know if students are “getting it” without relying on puzzled looks from around the room.
Using pre-recorded videos is also incredibly helpful for any sort of demonstration. They allow students to watch and re-watch as many times as they need to understand what you are demonstrating. Whether it’s a painting technique, a coding process, an electrical circuit, or the use of specialized software, the ability to re-watch and pause at critical spots can be key to student learning. It’s no surprise that millions of people go to YouTube every day to learn how to do anything from bake sourdough bread to change a tire or to sew a face mask.
When we talk about video here this can refer to either live-action video such as video of you demonstrating a painting technique, showing examples of local plants, or speaking directly to your students or it can refer to video created from narrated slide presentations either with or without video of you personally.
Presentations
Many faculty have PowerPoint presentations that keep them on track when they’re lecturing in person. If you are considering taking PowerPoint files like these and recording audio over them, stop and first take a good look at how they are presenting the information
Before starting to record, it’s important to consider the ways people take in and process information from text, audio, and visual sources. Research shows that students often benefit from a verbal description of an image, chart, diagram, or other visual more than from reading a text description.
Research on multimedia learning has also shown that people learn more deeply
- from words and pictures than they do from words alone (spoken or in text),
- from graphics and narration alone than from graphics, narration, and on-screen text,
- when cues are added to visually or verbally highlight key information and organization,
- when extraneous text, decorative graphics, extraneous audio such as animation or transition sounds are eliminated,
- and, as discussed in the audio section on the previous page, when the narration is in a conversational style
To help avoid some of the pitfalls identified in the research, use keywords on your slides instead of sentences, break longer slides down into multiple smaller ones with fewer words, and consider using animations to bring words in only when you need them,
If narrating presentations is something you plan to do, please think about the information on visual design more generally as it applies equally to slides as it does to Canvas pages or Word documents.
Screencasts
Screencasts are where you record your computer screen as you are explaining what you are showing your students. While you most often see screencasts in technical tutorials, they can be effective in other was such as walking your students through your syllabus and course shell at the beginning of the semester or showing them how to use more complex web resources like data repositories,
When creating screencasts it’s very important to actually say what you are doing. Students watching a screencast on a smaller mobile device may not easily be able to see smaller details so say “and now I’m clicking on the ‘more information’ link at the top right” instead of “so I’m clicking here and . . . . ” If you have a student who needs accommodation for a visual disability, make sure to connect with Assistive Technology and Accessibility Center, as they may need audio descriptions of what is happening on the screen.
Live-action Videos
While making basic webcam video can be a scary process for some, personal video shows students that their instructor is a real human being. This is important in online classes as it’s easy for students to forget that the person teaching the class is real if they don’t see them. If you’ve never recorded video of yourself before, it’s perfectly fine to start small. A simple personal introduction at the beginning of the course is a great place to begin. Things like a course introduction, short weekly or bi-weekly summaries of the previous module (addressing questions or concepts that students are struggling with), and introductions to the upcoming module are also great ways to start.
If you’re concerned that you look like you’re reading in your video (likely because you are reading off a script), try Teleprompt.me, a web-based teleprompter that automatically advances as you speak the words in your script.
You can record video of yourself using Zoom or Kaltura (either Personal Capture or Express Capture) using a webcam on your computer. You can record using Zoom on an iPad, iPhone, or Android phone by installing the Zoom app. You can even use the selfie view on your phone’s camera to record yourself. If you choose to record on a mobile device, it’s best to sit the device on something stable rather than trying to hold it in your hand while you’re recording.
There are some standard recommendations for recording personal video.
- Wear solid color clothing.
- Be careful with jewelry, scarves, and other accessories if you have a habit of playing with them while you talk.
- Make sure you are not seated or standing in front of a light source like a window. Backlighting is a common problem and can leave the speaker so shadowed that they look like a silhouette. Facing your light source instead makes a big difference.
- Talk to the camera. That’s where your students are.
General “Do”s and “Don’t”s for Video Recording
- Do make sure visual aids (images, graphs, diagrams, etc.) are as crisp and clear, as they can be. If the image is important enough to include, it should be readable on a small or large screen.
- Do have clear audio with background noise kept to a minimum. Do a test recording and see what you hear that you may not notice just sitting in the room.
- Avoid background music when you are speaking. It’s extraneous audio that can distract student attention from what you’re saying.
- Do have enthusiasm! If you’re not enthusiastic about what you’re saying, why would your students be?
- Do watch your pace. If you normally speak quickly try to make a point of slowing down so students can easily follow you.
Whether you are recording audio on a presentation or a video of yourself, if you plan to reuse the video the following tips will help.
- Don’t talk about dates. Say “later in the semester” or “in the next few weeks” instead of “by the end of October” which would be confusing in the spring semester.
- Don’t talk about specific pages or chapters (or possibly also books). New editions come out regularly with new chapter titles and different page numbers.
However you choose to record, one big thing to keep in mind is that your video and audio don’t have to be perfect. Students appreciate the humanness of an instructor when things aren’t perfect and research has shown the more informal videos are more effective for learning than professionally produced ones.
Resources
California State University. Copyright and Fair Use: Common Scenarios
Chapter Questions
- Explain the process that an instructor would use to determine whether instructional materials are accurate and relevant to course content.
- When evaluating text-based materials, what are three factors an online instructor should consider? Why is each one important?
- What are the key considerations when reusing content in an online course? How can an instructor ensure compliance with copyright laws?
- When developing your own instructional materials, what are two strategies you can employ to ensure that your content is appropriate and well-designed?
- What are two advantages and two challenges of using videos in an online course?
- Explain one instance when you would use a presentation in an online course. Be specific.
